1. godot-destructible-body A dynamic destruction plugin for the Godot Game Engine. (half, for the reason that it is for G3.

I seemed to be able to hastily convert the project to Godot_v4.3-dev5

godot-destructible-body-g43-convert-2.zip
759kB
6 days later

Hello there!

@Tomcat that looks very nice! I am not exactly sure how to make breakable boxes yet, but this seems very useful if I want to make destructable solid objects such as stone columns or walls. I need to find out how they make breakable boxes in Crash Bandicoot (I mean any game with boxes really).

I updated my project with a new feature. We can now open a menu and select between 3 controller schemes:

  • One Stick Controller (move with Left Stick, aim with Left Trigger, shoot with B)
  • Two Stick Controller (move with Left Stick, aim with Right Stick, shoot with Left Trigger)
  • Two Stick Auto-Shoot Controller (move with Left Stick, aim and shoot with Right Stick)

Does not look like much on-screen without seeing the gamepad!
Is there an easy way to show the gamepad input on screen :/ for demonstration purposes ?

Anyway, you can try it for yourself by cloning the repo 😃 !

    Nodragem I am not exactly sure how to make breakable boxes yet, but this seems very useful if I want to make destructable solid objects such as stone columns or walls.

    If the destructibility is partial (columns), Option 1 is suitable, with subtraction of the destructible volume. If the destructibility is full (boxes), it is better to use the preliminary fragmentation from Option 2. Walls — depending on the situation.

    Is there an easy way to show the gamepad input on screen :/ for demonstration purposes ?

    You can display gamepad buttons in the corner of the screen and highlight the buttons that are pressed or display only those that are pressed at the moment.

    a month later

    Hoho, I forgot to post last week's update here 😃 !
    Basically, I made a little level using Kaykit's Prototype Bits. I arrange my level into 2 structures:

    • A Gridmap for the static, modular elements that are on-grid (2x2 elements on a 1x1 grid).
    • Normal Node3Ds for static off-grid elements (some of them will be interactive).

    I will post this week update on Sunday I think.

      Nodragem Looks awesome! Wish I had this a couple of years back when I started my own project (also a top down shooter)

      I forgot to post yesterday as I was making my first Pull Request to the Godot Engine:
      https://github.com/godotengine/godot/pull/91874#issuecomment-2108360729
      It's about changing the default behaviour when drag and drop object in the 2D/3D Viewport.

      In terms of the Starter Kit, I added destructible elements.

      I was the occasion to find a workflow where I can import 40 glb files as destructible objects.
      Godot imports GLB files implicitly as scenes (.scn file) in the .import folder of our projects. And with the advanced import and post-import script you can shape the .scn file basically. So here is the post-import script I am wrote (on the left) and what the results of what it does on the (right):

      It basically add a RigidBody (in Kinematic mode), a AABB Collision Shape and a script to the root node (destructible.gd).

      And a quick example of how I use it:

      Note that if your assets are already in a level (.tscsn file, as it was for me), it is a bit more complicated to use. Godot automatically keeps the properties of the objects in the level as they were before the re-import. That is good for keeping the object in the same position as before the re-import, but, guess what? the script slot is a property!! so Godot will force it to null as before the reimport and the object won't be destructible.

      My temporary solution was to open VS Code and delete all occurence of script = null in the .tscn file of the level 😄
      I will probably open a proposal to discuss this behaviour. Godot should probably keep the script that the user added through the post-import.

      Looks sick!!! This makes me want to start a 3D project but I gotta restrain myself, I already have 2.5 games in progress 😃

      Adding some enemies would be nice.

        6 days later

        Curious. How do you deal with a twin-stick controller and strafing? I'm currently redoing my player character with animationTree and BlendSpace2D where I blend the different forward and side strafing animations.

          MikeCL In short, I did not implement an "actual straffing".
          What I mean is that:

          • you can strafe because of the twin stick mechanism that allows you to move with the left stick and aim with the right stick.
          • but there is no special straffing animation playing when the player moves at 90 deg of their aim (i.e. crab movement of the legs)
          • it works well because of the camera placement (top) and the chunkiness of the player model.

          At the moment, I use this system:

          Note how I ve put in place a "straffing" animation as a transition but I don't use it for now.

          Why a Transition rather than a BlendSpace2d?
          -> Because my plan is to implement a aiming button as in Zelda's Ocarina of time, where the player locks an ennemie and circle around it. So the straffing will just be an On/Off thing.

          But if I wanted to have the straffing animation playing whenever the player is aiming at 90 deg from its movement vector, I would probably:

          • compute a cross product between aiming vector and movement vector and take its absolute value;
          • set up a BlendSpace2D to mix Idle, Running, Straffing into one space;
          • link movement speed to Idle-Running ;
          • link aforementioned cross product to Running-Straffing
            7 days later


            Here is the final kill animation. These is just a in-game test here, the enemy is set to play the same animation again and again and I do as if I am shooting at him.

            This week I am working on the actual IA. Here I've got a simple navigation region and agent working for a chase behaviour:

            2 months later

            Hello!

            A long time I did not post an update, sorry!

            Since then, I basically added the AI for the meelee enemies:

            And I started to work on putting together a part of the level (which I call Beat 2), where the player will have to activate 2 switches while being sent waves of meelee enemies.

            That was the opportunity to work on a switch and door system :slight_smile:
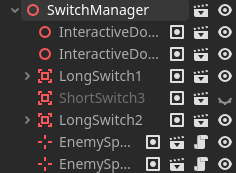
            The switch manager basically holds a list of its emitting children (e.g. switch) and its receiving children (e.g. doors, spawners) and it activates the receiving objects when the emittings object are all switched ON.

            What's next? I will be adding:

            • a first room with just a simple switch to teach the player that they need to look for switches to open the doors
            • replace the placeholder switches/doors with better assets

            Then it will be time to work on Beat 1, which is the intro of the game (i.e. the player wakes up in a lab/workshop and speaks with a scientist).

            Hopefully I will give more regular update now that I am back from annual leave :rocket:

            14 days later

            Hello,

            I have been working on making new rooms for my levels to showcase the new switch system:

            There are 5 type of elements in the current Switch system at the moment:

            • Long Switch: where the player needs to hold the action button for a while before the switch gets activated
            • Short Switch: where the player just need to press the action button once to toggle the switch
            • Door: it can opens or closes
            • Spawner: it can spawn an object or enemy at a specific rate for a specific duration. You can set it up for instance so that it spawn 1 wave of 3 enemy every 10 sec.
            • Switch Hub: it connects Switch elements together. For instance: 2 switch needs to be activated so that 2 doors get opened.

            Here is how I set up my switches and doors:

            (I've made the 3d assets for the doors and switches 😃)

            21 days later

            Hello!
            Here is some progress on making an introduction cutscene and dialogue using the AnimationPlayer and the Dialogic2 add-on.

            Here a preview of the results:

            It was quite difficult to use Dialogic tbh, there is a lack of documentation and some unexpected behaviour.
            But once you find out how to put things together, it is quite nice to use!

            I still need to double-check how much memory and CPU usage Dialogic eats away though.

            What do you personally use to create cutscenes and dialogues in Godot?

            This week, I have been working on items and how their pickup can trigger a dialogue, a cutscene, and/or unlock part of a level.

            Note how the purple/gold door is opening only at the end of the dialogue.

            I have attached a screenshot of the code below. The on_card_pick_up() starts an animation in the CutSceneManager, which calls Dialogic to start a dialogue at a specific line (OnCardPickedUp). Then Dialogic sends a signal "Scene2_Ending" which is processed by on_cutscene_finished() and opens the door.

            As usual, all the code is available in the github repo of the starter kit:
            https://github.com/Nodragem/twin-stick-shooter-starter-kit
            I improved the explanation on how to install the kit for the first time (as there are now add-ons to install!)

            By the way:

            • let me know if there are specific things you would like me to add to this kit next?
            • I am considering changing the name to something like Top-down Action/Adventure starter kit as it turns to be less of a shooter than expected 😃 what do you think?

            Also, I will probably release a .exe directly downloadable soon, but I am waiting to add proper mouse/keyboard controls.